LINN SONDEK LP12 SET-UP MANUAL
LINN SONDEK LP12
SET-UP MANUAL
size=2>
size=2>
IT IS
EXTREMELY IMPORTANT THAT YOU READ THIS ENTIRE MANUAL BEFORE ATTEMPTING TO SET UP
YOUR LINN SONDEK LP12. FAILURE TO DO SO WILL, AT BEST, RESULT IN SUBSTANDARD
PERFORMANCE, AND MAY IN EXTREME CASES, RESULT IN PERMANENT DAMAGE TO THE
TURNTABLE.
size=2>
size=2>We
realize that the policy of most hi-fi enthusiasts is, "If all else fails, read
the instructions". However, the set-up procedure used on the Linn Sondek, while
not terribly difficult, is significantly different from that used on other
turntables. It is virtually impossible to set the table up correctly without
following the steps in this manual.
size=2>
size=2>These instructions refer specifically to the set up of the Linn Sondek
LP12 when it is being fitted with a Linn tonearm, and cartridge. Appropriate
notations will be made for variations in procedure for other arms and cartridges
(see "Selecting a Tonearm and Cartridge").
size=2>
size=2>WHAT WE MEAN BY TIGHT
size=2>
size=2>Since we are
dealing with a transducer that has to recover information considerably smaller
than a millionth of an inch from phonograph record, it is important that all the
fasteners (nuts and screws) in the turntable be very tight. Whenever the
instructions call for you to tighten a fastener, we do mean TIGHT, probably
tighter than you ever would have imagined. However SANITY MUST PREVAIL in
tightening these fasteners. There is no advantage to tightening them past the
point where the associated material will deform, since you are then simply
stretching or crushing the materials involved and destroying the structure. A
good rule of thumb is simply to bring the nut or screw up to where it seems very
tight and then turn it about 1/4 turn more (in the case of armboard screws,
which are put into wood, 1/8 turn will do).
size=2>
size=2>
size=2>TOOLS NEEDED
size=2>
size=2>5/16" or 8mm Hollow Shaft' Nut Driver
size=2>
size=2>#2
Philips or Posidrive Screwdriver. (The cross-slot screws on the LP12 are
Posidrive, but Philips will work.)
size=2>
size=2>#1
Philips or Posidrive Screwdriver.
size=2>
size=2>Medium (about 5/32" wide) Flat Blade Screwdriver with large handle (This
is for cartridge mounting-a jeweler's screwdriver will not
do!)
size=2>
size=2>Medium Needle Nose Pliers.
size=2>
size=2>2mm Hex. Key (Allen key)
size=2>2.5mm Hex. Key (Allen key)
size=2>
size=2>Hex Keys supplied with tonearm.
size=2>
size=2>Turntable Set-Up Jig or substitute. (It will be necessary to have the
turntable set up where you can both reach and see the underside of the table.
Linn dealers have a special set up jig for this purpose. If you are doing this
without a set up jig, it will be necessary to suspend the table between two
Objects. Make sure they are steady enough and stand firmly enough that they will
not tip or slide and allow the turntable to fall.)

size=2>
size=2>STEP BY STEP TURNTABLE SET-UP
size=2>
size=2>CAUTION!!!!
size=2>
size=2>MAKE SURE THAT THE TURNTABLE IS UNPLUGGED FROM THE A/C OUTLET BEFORE
REMOVING THE BOTTOM COVER! HIGH VOLTAGES ARE AVAILABLE ON THE CIRCUIT BOARD!
FAILURE TO OBSERVE THIS PRECAUTION CAN RESULT IN SERIOUS ELECTRIC
SHOCK!
size=2>
size=2>Please note that, on turntables equipped with the Valhalla circuit board,
the board is "live" at all ties. The on/off switch does not turn. The A/C on and
off, it simply sends a control pulse to the board, which results in the motor
being turned on or off.
size=2>
size=2>**************************************************************************************************************************
size=2>
size=2>PREPARATION
size=2>
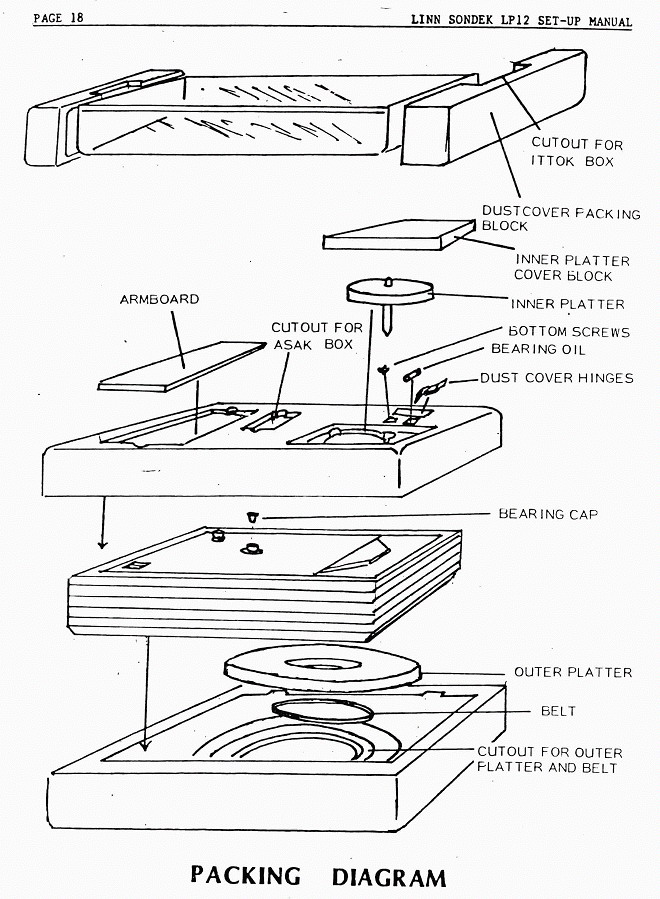
size=2>1)
Unpack the turntable. The dust cover will be packed in the top. Below this will
be the top packing block, which should contain the following: 1 armboard, 2
dustcover hinges, 2 screws, 1 inner platter/spindle assembly, 1 vial of bearing
oil. (See packing diagram)
size=2>
size=2>2)
Place the turntable in the set up jig (see "TOOLS NEEDED" above), and lock it in
place.
size=2>
size=2>Steps 3 through -9 will involve checking to see that none of the
fasteners on the table have loosened in transit from the
factory.
size=2>
-
size=2>MAKE SURE THE
A/C POWER IS DISCONNECTED! Remove the bottom cover by removing the two front
feet, and loosening the back two feet until they release the cover. If you are
working on a previously set up table, you will have to remove the screw that is
located halfway between the two front feet and the corresponding screw between
the two back feet. (SEE "PACKING CAUTION" NOTE).
size=2>
size=2>4)
Use the 5/16" or 8 mm. nut driver to remove the nuts holding the ground wire and
the P-Clip to the main assembly bolts. (See "Turntable Layout"
diagram).
size=2>
size=2>5)
Check to see that the nuts found above these nuts on the main assembly bolts are
tight, and tighten them if they are not. The main assembly bolts pass through
the wood mounting blocks of the base, and can work loose due to the expansion
and contraction of the wood.
size=2>6) Looking down
at the stainless steel top plate from above, locate the two small Posidrive wood
screws that fasten the top plate to the blocks in the wood base. They can be
found next to the main assembly bolts. located at the center front and center
rear of the top plate. Make sure that these two small wood screws are
tight.
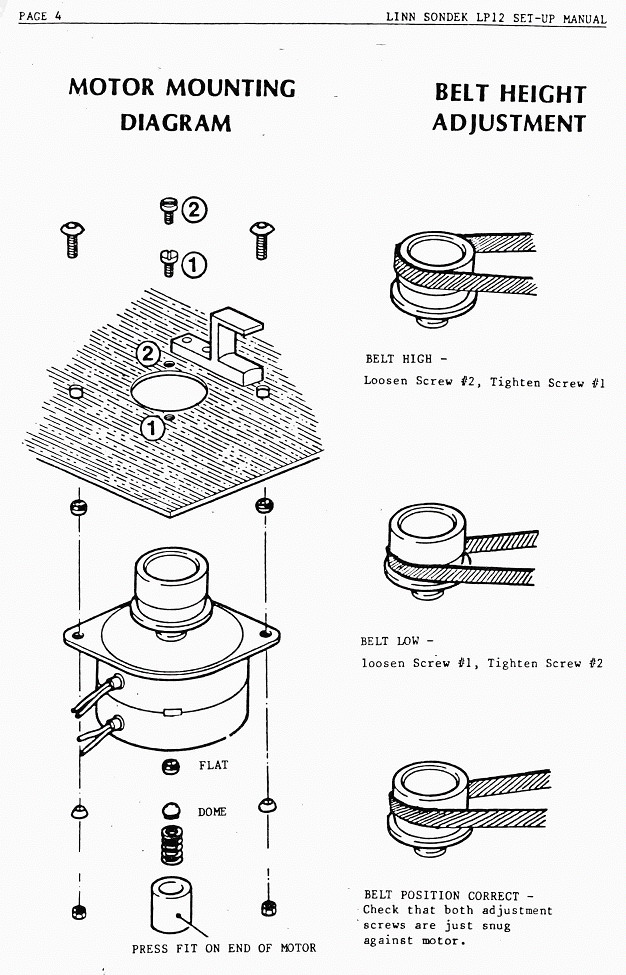
size=2>7)
Check the mounting position of the motor. The motor mounting bolts mount in
elongated slots. (Refer to the "Motor Mounting Diagram".) On turntables with the
large 5OHz pulley (27/32" or 21 mm diameter). the motor- sits in the middle
position. This is most easily accomplished by having one motor mounting bolt at
the outside of the slot, and the other at the inside of the slot. On decks with
the smaller 60 Hz pulley (11/16" or 17 mm pulley diameter), the motor should be
in the outermost position, which is accomplished by having both motor mounting
screws at the outside of the slot. ON NEW TABLES, THIS POSITION SHOULD BE
CORRECTLY SET FROM THE FACTORY.
size=2>
size=2>Please note that all new turntables; i.e., those that come factory
equipped with a Valhalla circuit board, use the larger 50 Hz pulley and thus
should have one motor mounting bolt at the extreme outside end of its slot and
the other bolt at the extreme inside
position.
size=2>8)
Check that the motor mounting screws are tight. Once again, there is no
advantage to over tightening these screws! You will simply crush the motor
mounting domes (refer to the "Motor Mounting Diagram").
size=2>
size=2>9)
Check that the bolts that mount the main turntable bearing to the subchassis are
tight. These are accessible from the top, through the hole in the center of the
stainless steel top plate, by shifting the sub chassis from one side to the
other. Current Linn Sondeks- use 2.5 mm metric hex key bolts, older units may
use 2 mm or 2.35mm hex key bolts, Philips screws, or slotted
screws.
size=2>ARM MOUNTING
size=2>10) Unbox the tonearm and cartridge.11) Mount the arm
base on the tonearm board. In the case of the Linn arms, this is affixed with
three metric socket-head cap screws from the bottom. These should be tightened
until the serrated lock washers just begin to sink into the armboard. On arms
using other mountings, make sure the mounting screws or nuts are very tight. On
arms using a single large mounting nut, this does mean using a wrench, not your
fingers.12) 0n the Ittok, or other arms using independent armrests, mount the
armrest on the armboard. There is a pop-out plug in the armrest hole of pre-cut
Linn armboards, which you must remove. Orient the armrest so that the knurled
height lock screw will be to the outside when the armboard is mounted in the
table, and tighten it enough so that it does not shift. The Ittok armrest nut
may be tightened with a 12mm wrench or large jaw pliers.
size=2>
size=2>13) Loosely mount the armboard on the turntable, using ONLY THE TWO FRONT
WOOD SCREWS at this time. Bring the screws up just short of snug, so that the
armboard can be easily shifted from side to side.
size=2>
size=2>PRELIMINARY ARM CABLE DRESSING
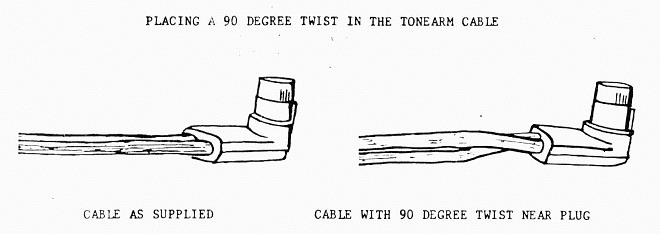
size=2>14) Before mounting the arm cable, it is a good idea to pre-form it. As
the cable comes out of the box, it will be folded, and have bends that make
dressing it difficult. Running a hair-dryer close to the cable will relax it so
that it can be straightened. After straightening the cable, put a 90-degree
twist in it just behind the plug, per the illustration.
size=2>15) Pre-stress
the P-clip by collapsing it with a pair of pliers, per the
illustration.
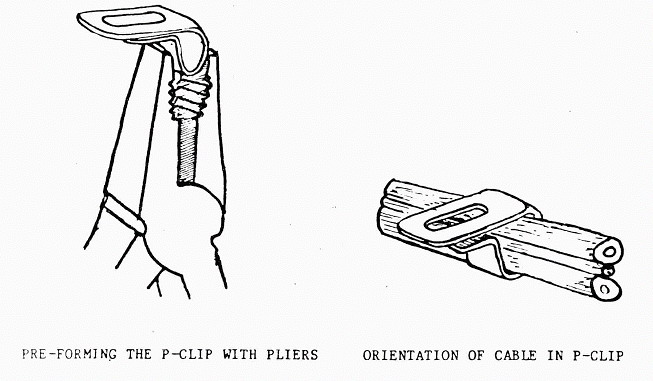
size=2>16) Place the
P-Clip on the arm cable, about 6 3/4 inches from the plug, (Distance not
critical.) Orient the cable in the P-clip so that its wide dimension will run
vertically, per the illustration.
size=2>17) Slip the washer, P-clip, and nut onto the rear assembly bolt, with
loop of the P-clip towards the rear of the turntable. DO NOT TIGHTEN THE NUT AT
THIS TIME.
size=2>
size=2>18) Place the ground lead and nut onto the front assembly bolt, and
tighten the nut down.
size=2>
size=2>19) Scrape a little bit of the paint off the subchassis right around the
remaining open armboard hole, to allow for a good ground connection. Take the
remaining small wood screw for mounting the tonearm board, and slip it through
the eyelet of the tonearm. Ground lead, and the eyelet of the turntable ground
lead, and thread it into the back armboard hole. Run it up just short of snug at
this tie, so that the armboard is still loosely mounted. (Alternatively, you may
wish to remove the eyelet from the ground wire of the tonearm, and tack solder
the wire directly to the tag of the eyelet on the turntable ground wire. This is
not necessary, but it eliminates one eyelet, and allows the armboard mounting
screw in this position to be turned in as tightly as the others without risk of
stripping out the hole.)
size=2>FITTING THE BELT AND PLATTER
size=2>20) Place the entire charge of oil in the main bearing. The oil may be
held in the vial by surface tension. If this is the case, touch the lip of the
vial to the inside surface of the bearing liner, and the oil will flow
out.
size=2>
size=2>21) Take the inner platter/spindle assembly, and remove the protective
plastic coating from the spindle. Wipe it clean with, a lint free cloth. Place
the inner platter/spindle assembly into the main bearing. It will take several
seconds for the inner platter to settle into the main bearing, as it forces the
oil up the sides of the bearing.
size=2>
size=2>22) Place the belt on the inner platter and pulley.
size=2>
size=2>23) Place the outer platter and felt mat on the inner
platter.
size=2>
size=2>MOUNTING THE CARTRIDGE
size=2>24) Mount the cartridge on the tonearm. DO NOT COMPLETELY TIGHTEN DOWN
THE MOUNTING SCREWS AT THIS TIME. The cartridge must be mounted loosely enough
to allow you to shift its position with your fingers. It will be tightened
later.
size=2>
size=2>25) Place the tonearm in the mounting collar on the
armboard.
size=2>
size=2>26) Place the counterweight on the tonearm, position it for zero balance,
and set the tracking force vernier for the appropriate tracking force (1.7 grams
in the case of the ASAK).
size=2>
size=2>27) Place a record on the platter, set the tonearm on the record, and
adjust the arm tube so that it is parallel with the surface of the record.
Tighten the height lock screw enough to hold the arm temporarily in this
position.
size=2>LINN SONDEK-LP12 SET-UP MANUAL PAGE 9ADJUSTING THE
SUSPENSION
size=2>28) Use a bubble level to make sure that the plinth (base) of the table
is sitting level.29) Level the-suspension by turning the three nuts under the
spring assemblies up or down. The armboard should be visually leveled with the
edge of the base (NOT with the stainless steel top plate, which is designed to
sag in the middle), and the platter should be visually leveled with respect to
the base.
size=2>
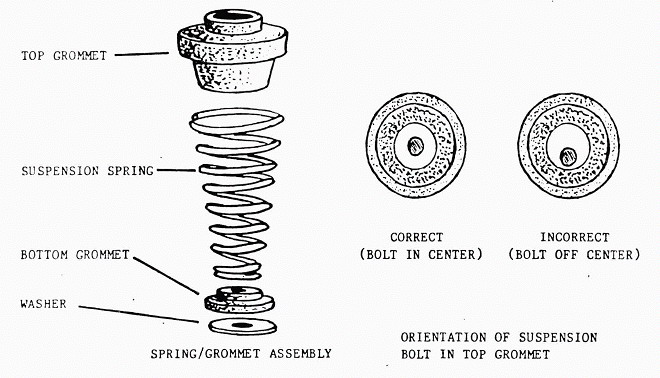
size=2>30) To function properly, it is necessary that the suspension be free to
move in all directions. This is accomplished by turning the entire
spring/grommet assembly so that the main bolt passes as nearly as possible
through the center of the grommet (see illustration). Do this for all three
spring/grommet assemblies. It may not be possible to exactly center all the
grommets, but the idea is to get them all as near on center as you can. When you
are finished, the suspension should move freely about 1/8 inch when tapped from
any direction. It necessary while doing this to make sure that you do not move
the suspension to a position where the armboard touches the base or stainless
steel top plate. (If you find that the suspension refuses to move freely, it may
be that one or more of the springs was twisted and failed to come back to the
relaxed position when you turned it to adjust the chassis position. If this is
the case, you can reach up and pull the spring down from the top grommet to
release the twist; this should stop the erratic behavior of the
suspension.)
size=2>31) In, the act of centering the suspension, you may have slightly
changed the height of the suspension, either by turning a nut with the
spring/grommet assembly, or because the springs compress slightly differently in
different positions. Go back at this time, and check the height of the
suspension, and readjust if necessary.
size=2>
size=2>32) The suspension should now be leveled and centered. The armboard
mounting holes provide a certain amount of play in the position of the armboard.
Shift the armboard so that it is aligned parallel in the cutout. (It may not be
possible to get this dead perfect, but it is a cosmetic adjustment
only.)
size=2>
size=2>33) Tighten the three armboard mounting screws. These need to be tight,
but they do go into wood, so use some restraint. It is particularly easy to
strip the screw that goes through the ground lead eyelets.
size=2>
size=2>34) Check once again to see that the top surface of the armboard is level
with the top of the base.
size=2>
size=2>FINAL DRESSING OF THE ARM CABLE
size=2>35) Plug the cable into the arm, allowing enough slack so that the cable
is not pulling on the suspension; but not so much that the cable can sag and
rest on the bottom board of the turntable or push on the
suspension.
size=2>
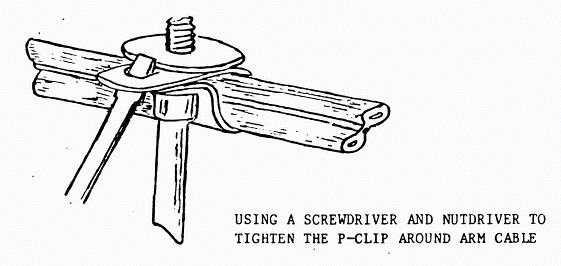
size=2>36) Tighten
the nut that holds the P-clip until it is just short of causing the P-clip
ratchet surfaces to engage. Slip a screwdriver through the elongated hole at the
top of the P-clip, and using the washer as a pivot and the screwdriver as a
lever, pull the P-clip tight around the cable (really tight!). Tighten the nut
enough to engage the ratchet teeth of the P-clip to prevent it sliding back.
Remove the screwdriver, and hold 'the P-clip in position while you finish
tightening the nut. Tighten the nut until it just begins to bite into the nylon
of the P-clip. It is important that the loop of the P-clip be positioned towards
the rear of the turntable, as per the "Turntable Layout" diagram. When you are
done with this operation, it should not be possible to pull the arm cable
through the P-clip, r move the P-clip, with a stout tug.
size=2>37) Place a sharp bend in the arm cable-as it exits the P-clip on it path
through the cut-out in the rear of the base (as per the "Turntable Layout"
diagram).
size=2>38) Unplug the arm cable from the bottom of the arm. The position of the
armboard should not change whether the cable is plugged in or unplugged, since
this could indicate that the arm cable is pushing or pulling on the suspension.
If the armboard is being pulled slightly, it is usually possible to correct this
without completely re-dressing the cable by grasping the cable firmly between
thumb and forefinger next to the P-clip, and pulling firmly down its entire
length towards the plug. This will usually straighten it enough to correct the
problem. If the armboard is being pushed slightly, it can be corrected by
turning the P-clip EVER SO SLIGHTLY by pushing on it with your thumb while
tightening the nut that holds it. This will rotate it a slight bit and pull on
the arm cable. If this will not correct the problem, you will have to redress
the cable, per steps 35 and 36.
size=2>
size=2>FINAL ARM AND CARTRIDGE ADJUSTMENTS
size=2>39) Having completed the suspension set up, set the overhang and
alignment of the cartridge in the tonearm. Use the template provided with your
arm, or alignment protractor if you are using an arm that has no template. The
cartridge should be mounted loosely enough for you to shift it to the correct
position with your fingers. After aligning it, REMOVE THE ARM FROM THE TABLE,
and then tighten down the cartridge with a reasonably sized screwdriver and pair
of pliers. The cartridge must be mounted TIGHTLY in the headshell. If it cannot
be mounted tightly, then it will not perform well, however clever the design
might be. (See "Selecting an Arm and Cartridge".)
size=2>
size=2>40) Replace the tonearm, and adjust it so that it is parallel with the
surface of the record. Lock the tonearm in position. The tonearm should be
tightly locked, but again, use restraint. It is possible on the Linn tonearms to
tighten down the height lock screw to the point that you deform the arm pillar
if you attempt to use this adjustment as a body building
exercise.
size=2>
size=2>41) Plug the tonearm cable into the arm, and using the small Allen screw
in the side of the tonearm pillar, lock the plug in position.
size=2>
size=2>MOTOR AND PULLEY ADJUSTMENT
size=2>42) Replace the bottom cover of the turntable. Screw in the front two
feet, and tighten the back two feet. Check when replacing the bottom to see that
the arm cable and the A/C cable exit through the slots
provided.
size=2>
size=2>43) Plug the turntable into an A/C outlet.
size=2>
size=2>44) Remove
the outer platter, record and mat, and replace the outer platter on the inner
platter, UPSIDE DOWN.
size=2>45) Turn on the turntable, while observing the position of the belt. The
belt should drop down to the bottom of the pulley when the table is turned on,
and ride up to the center position on the pulley, where it just reaches its full
diameter once the table is up to speed (refer to "Belt Height Adjustment"
diagram). On new tables, this adjustment is set from the factory, and probably
will not require adjusting. However, if the belt should fail to drop down on
start up, the motor tilt needs to be adjusted. This is accomplished by FIRST
LOOSENING the motor tilt adjusting screw nearest the inner platter, and then
tightening the outer screw, which will tilt the motor out, making it easier for
the belt to run down on start up. Conversely, if the belt fails to ride up, the
motor can be tilted in by FIRST LOOSENING the outer screw, then tightening the
inner one. Once the correct belt position has been achieved, or assuming it as
correct originally, see to it that both motor screws are actually turned down so
that they are touching the motor casing. THESE SCREWS SHOULD BE SNUG ONLY!
FURTHER TIGHTENING WILL SIMPLY BEND THE CASE OF THE MOTOR, AND RENDER FURTHER
ADJUSTMENT IMPOSSIBLE!
size=2>
size=2>When the belt drops to the bottom of the pulley, the bottom edge of the
belt should scrape against the metal belt guide that is attached to the
stainless steel top plate. This helps remove any static build-up from the belt.
If the belt is dropping to the bottom of the pulley but does not touch the belt
guide, the entire motor must be lowered relative to the top plate. This is most
easily accomplished by simply tightening both tilt adjustment screws and
intentionally forcing the motor down. This should be done very carefully,
checking your progress after each half turn of the screws. After this operation
is completed, double-check the action of the belt upon turn-on and readjust the
pulley tilt if necessary.
size=2>
size=2>46) At this time, the adjustment of the turntable should be complete. It
is normal for the motor to make a very soft ticking sound if you listen close to
the table. However, occasionally one will encounter a motor that makes an
excessively loud ticking or scraping noise. If this is the case, the problem is
with the adjustment of the bottom bearings of the motor, and not with the motor
itself. UNPLUG THE TABLE FROM THE A/C POWER. Remove the bottom panel. Pop off
the bearing cap on the bottom of the motor (refer to the "Motor Mounting
Diagram"). It is a force fit, and simply pulls off with your hand. Check to see
that the thrust pad on the bottom of the motor shaft is squarely seated, and
does not wobble as you turn the motor shaft. If it does, you can remove it by
popping it off with your fingernail, and reseat it squarely by pushing it back
on. If this is square, check to see that the spring and thrust bearing assembly
are seated all the way down in the cap. You can press it down with the eraser
end of a pencil to seat it. Re-lubricate the top of the thrust bearing with a
dab of light grease (or petroleum jelly [Vaseline] if nothing else is available)
before popping the cap back on the motor. Be careful not to get any grease on
the edges of the cap, since it is a friction fit. After popping the cap back on,
push down on the motor pulley from above. The pulley should push down, then
spring back up to its original position when you let go. If you dislodge the cap
when you push down on the motor pulley, you have not correctly seated the spring
in the cap.
size=2>47) Replace the bottom panel. Plug the table in, and check to see that
the motor is now quiet.
size=2>
size=2>FINAL ASSEMBLY AND ADJUSTMENT
size=2>48) Replace the two front feet and tighten the screws on the two rear
feet. To keep the bottom panel from sagging, put in the two screws that hold the
bottom panel at the center front and center rear of the base. (See "Packing
Caution" note.)
size=2>
size=2>49) Position the table where it will be used and replace the outer
platter and mat. It is very important that any turntable be used on a light,
sturdy surface, not a massive one. (See "Positioning the Turntable".) Make sure
that the turntable is level. A small amount of adjustment is possible by
changing the compression of the rubber feet by tightening or loosening the
screws that mount the feet to the base. If more adjustment is needed the foot
can be removed and a washer placed between the foot and the
base.
size=2>
size=2>50) Check the tracking force on the arm, and set the anti-skate
bias.
size=2>You are now ready to play music.
size=2>
size=2>PACKING CAUTION
NOTE***********************************************
size=2>
size=2>When repacking a turntable that has been previously set up, it is
necessary to remove the two bottom cover screws, one of which is found between
the two front feet, and the other between the two back feet. These screws can
nick the rim of the platter, which is packed below them, if they are left in
during shipping.
size=2>
size=2>************************************************************************************************************************
size=2>POSITIONING THE TURNTABLE
size=2>A
turntable's performance can be substantially degraded by improper placement. The
folk wisdom has been that a turntable should be placed on a very massive object
to isolate it from vibrations, perhaps extending even to a massive isolation
base with a compliant coupling below it. THIS IS ABSOLUTELY THE WRONG THING TO
DO! A turntable should be placed on a light but firm object, such as a rigid,
light coffee table or parson's table. Equipment cabinets loaded with amplifiers
and records are far too massive.
size=2>
size=2>The difference that can be obtained by placing the turntable on a light
object is startling. It improves every aspect of the sound. There is no
advantage, whatsoever, to placing a turntable on a massive object or isolation
base. The misconception being that massive objects isolate a turntable from
large amplitude vibrations due to their inertia. Although these objects move
very small amounts in response to the energy that strikes them, they move at
very, very low frequencies, well below the cut-off point of the suspension of
any turntable. The result is that you directly couple the turntable to all
manner of environmental noise, i.e. traffic outside and footfalls. Light objects
do not resonate at these frequencies, and do not couple the turntable at these
frequencies. Isolation bases with additional suspensions should be avoided. The
additional suspension interacts with the suspension of the turntable, (when one
moves, it induces a movement in the other suspension, which moves the first
etc.) and the whole thing becomes unstable and begins to oscillate. For the same
reason, flimsy, shaky surfaces should be avoided.
size=2>
size=2>The appropriate surface is a rigid, light table. You can use a wall
shelf, but it should be light (plywood, not particle board), and it should not
be attached to the brackets that support it. Allowing it simply to sit on the
brackets decouples it from the huge mass of the wall.
size=2>
size=2>If
you must se the turntable on a heavy equipment cabinet, it 'is possible to build
a small light platform with feet about 3 to 4 inches tall to isolate the
turntable. This "mini" coffee table on the cabinet works almost as well as a
light table on the floor. You must, however, make sure that the equipment
cabinet itself is very stable and can not rock back and forth. This usually
means that you must either have the cabinet seated firmly on the floor (not on
carpet), or braced against the wall.
size=2>SELECTING-A TONEARM AND CARTRIDGE
size=2>When selecting an arm for the Linn Sondek, it is extremely important to
remember that the tonearm is a more significant component than the cartridge.
The tonearm will generally be the limiting factor in the performance of any
cartridge. Thus superior performance can often be obtained by using an extremely
good tonearm with a decent budget cartridge, rather than by using an average arm
with a very good cartridge. The cartridge will simply overcome and excite the
weaknesses of the tonearm, resulting in a far worse sound than if an inexpensive
cartridge had been used with the same arm. In the case of Linn Products, for
example, it would make no sense whatsoever to use a Linn ASAK cartridge on the
Linn BASIK LV-X tonearm. The cartridge will simply overdrive the arm. Better
results could be obtained by using the cartridge from a Linn BASIK arm on the
Linn ITTOK LV-II tonearm. In short, you cannot select a tonearm without respect
to what cartridge you ultimately intend to use. And where budget limitations
prevail, put your investment into the tonearm first.
size=2>
size=2>Linn Products manufactures three tonearms, the ITTOK LV-II, the BASIK
LV-X and the BASIK LV-V. Any of these will produce excellent results if used
with a correctly selected cartridge on the LP12. The ITTOK is designed for use
with cartridges all the way up to the Linn ASAK, or other high performance
moving coil types. This type cartridge delivers an enormous amount of energy to
the tonearm and requires an extremely rigid arm with very tight bearings,
connections and mountings in order to work properly. In the case of the ASAK, do
not believe that it will work properly in any arm other than the Linn 1TTOK. The
Linn BASIK LV-X, which comes equipped with a good magnetic cartridge, is
suitable for use with higher performance magnetic cartridges and moderately
priced moving coils. Better overall results could be obtained with inexpensive
magnetic cartridge on the ITTOK than with a moderate moving coil on the LV-X.
But where the LV-X is considered to be a terminal or long term investment, it
would still make sense to use the better cartridge. (Again, we must emphasize
that there is no point whatsoever in putting an ASAK, in a Linn BASIK LV-X.) The
Linn BASIK LV-V, which also comes with a good magnetic cartridge, is suitable
for use with moderately priced and performing magnetic cartridges. It is not
suitable for use with low compliance moving coil cartridges.
size=2>
size=2>If you are
selecting an arm other than a Linn arm for use with the LP12, you must bear in
mind that the function of a tonearm is to provide a rigid link between the
cartridge and the turntable. Records have information smaller than a millionth
of an inch inscribed on them, and every bit of play in the arm, even at these
extremely low amplitudes, is going to result in some loss of information. This
means that most of the marketing ploys associated with tonearms (i.e., low-mass,
tangential tracking, unipivots, variable pivot-bearing arrangements, etc.) are
steps in the wrong direction.
size=2>LINN SONDEK LP12 SET-UP MANUAL PAGE 16
size=2>
size=2>A
tonearm should have a rigid headshell, with good connection between headshell
and cartridge. It should have a rigid, strong, arm tube. (Spindly, low mass arm
tubes are usually not very rigid). It should have bearings with as little play
as possible. (If you can grab the headshell and rattle the bearings, it is,
generally not suitable. Unipivot arms, in which the entire arm is free to
wobble, are of a very limited design and should be avoided.)
size=2>
size=2>The arm should have a solid mounting, both of the arm to its mounting
collar, and the collar to the turntable. (Rubber washers defeat
this.)
size=2>
size=2>Provided all the above criteria are met, the arm stands a chance of
performing reasonably well. However, failing to meet even one may be as bad as
missing several, since the energy will attack the weakest point in the
arm.
size=2>
size=2>The same consideration must be given to the mechanical integrity of the
cartridge. If a cartridge does not have mounting holes, through which stainless
steel hardware can be fitted and seriously tightened, it probably isn't suitable
for playing music. Cartridges with slots which allow the hardware to pop out
when tightened, or with internal threading which strips if tightened, cannot be
expected to work well. Likewise, removable stylus assemblies which don’t fit
tightly will produce poor results. (On cheaper cartridges, including the one
supplied with the Linn Basik arm, where the cost of the stylus is the major
portion of the total cost, it is advisable to super glue the stylus assembly to
the cartridge body.)
size=2>
size=2>Fundamentally, when choosing an arm and cartridge, one must always bear
in mind the order of precedence and the function of the system. A record player
is a mechanical system for recovering extremely minute information. It can only
do so if the cartridge body stands still relative to the movements of the
stylus/cantilever assembly, while all the time these same movements are trying
to move the cartridge body and every part of the tonearm. If all this is taken
care of, it is likely to reproduce a respectable semblance of
music.
size=2>MAINTAINING THE LINN SONDEK TURNTABLE
size=2> The Linn Sondek is designed to have a useful service life of at least
twenty years and a. such is constructed using materials that are meant to have a
maintainable appearance for that time. The following are suggestions for
maintaining the turntable:
size=2>
size=2>The turntable base, which is of solid wood, can be polished with lemon
oil or spray furniture polish. Avoid waxes, since they will build up in the
grooves on the base. Bear in mind that the base will darken with age, as do all
natural woods.
size=2>
size=2>Silicone polishes are suitable for the platter rim and stainless steel
top plate. NEVER use an abrasive polish on the platter, as it is lacquered, and
this could destroy the finish. The platter can be expected to darken some with
age, since the alloy is slightly photo-sensitive.
size=2>
size=2>The turntable at can be cleaned of lint with a lint remover or masking
tape.
size=2>
size=2>Every year or so, a small drop of oil can be applied to the top of the
motor shaft under the pulley. This should not be a detergent oil (sewing machine
oil works well). Only a drop or two of oil should be used.
size=2>
size=2>Similarly, the main bearing housing oil may be topped up. THIS IS NOT
REALLY NECESSARY UNLESS OIL HAS BEEN LOST DURING OPERATIONS ON THE TABLE. When
topping up, make sure that there is a slight surplus of oil, even at the expense
of the excess running out when the spindle is inserted, to ensure that the
bearing is full. PLEASE USE ONLY THE OIL PROVIDED BY THE MANUFACTURER! OTHER
OILS MAY DAMAGE THE BEARING.
size=2>
size=2>On
an annual basis, you should check to see that all the mechanical connections in
the system are tight. The energies involved in playing a record are enormous,
and can work these connections loose. DISCONNECT THE TURNTABLE FROM THE A/C
POWER BEFORE REMOVING THE BOTTOM COVER!
size=2>
size=2>The cover can be cleaned using any of the commercially available Perspex
or plastic cleaners, but the simplest approach is to remove any dust with a damp
tissue without any rubbing action, and to subsequently dust with a soft duster.
Covers are more likely to be damaged during cleaning than in
use.
size=2>
size=2>PLEASE RETAIN THE ORIGINAL PACKING, AND NEVER SHIP A TURNTABLE IN
ANYTHING ELSE! More damage is done to tables during shipping in inadequate
packing than in any other way. Remember that freight companies will not be
responsible for damage due to improper packing, and neither will the dealer or
distributor who receives a table for a minor repair, which has been wrecked in
transit to him.
size=2>A
packing diagram follows.
size=2>USELESS, DANGEROUS AND FOOLISH MODIFICATIONS OF THE
LP12
size=2>
size=2>Over the past ten years, we have seen dozens of attempts to improve the
performance of the Linn Sondek LP12. Believe us, if we ever found a way to
improve the performance, we would do it. Below is a list of things that we have
tried that DO NOT WORK. If any of them should happen to work for you, it
indicates that you have made an error in the set up of the table. That error has
caused a problem that is being "corrected" by your modification. In the process
of correcting that error, you are most likely causing the loss of some program
material. The best way to correct the problem is to set up the turntable
properly in the first place (re-read the entire set up manual if
necessary).
size=2>
size=2>1.
Damping material on the subchassis, tonearm, cartridge, or anyplace else. (The
idea being to damp resonances.) This totally defeats the design of the Linn
Sondek. We want any energy in the system to be present at all points in
the-system. This way, any energy that affects the platter is also transmitted to
the arm. The | 